Exploring Nmap
Automating the process of decoy scanning and source spoofing
2020-12-28 * Wintrmvte
Introduction
Nmap's decoy scan is one of my favourite features regarding this tool: it allows us to specify additional IP addresses that will show up in IDS logs as fake scanning hosts. It is a really effective technique to harden discovery of the original address that issued the scan. The syntax looks as follows:
nmap -D <host_1>,<host_2>,<host_N>... <target_host>Each host is separated with a comma and passed after -D command-line flag.
The only drawback of this method is that each decoy host should be up and running to prevent SYN flooding of the target that is being scanned. Additionally, specifying each address by hand isn't really time-efficient. That being said, we will try to perform the following:
- Discover active hosts on current LAN
- Specify discovered hosts with Nmap's
-Doption in terminal
Let's get started :>
Hosts discovery - Netenum
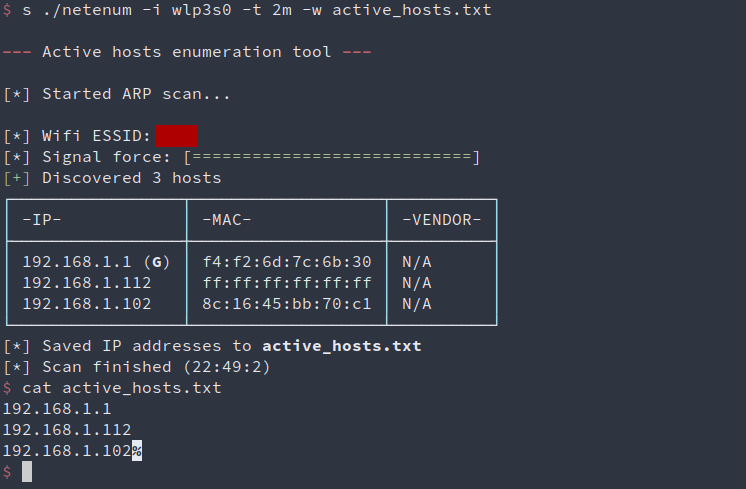
Our goal in this step is to find active hosts' IP addresses and save them to a file for further use. To achieve this, we will use Netenum, a python network sniffer that allows extracting members of ARP conversations and saving them to desired output. The command should be something like that:
$ sudo ./netenum.py -t 2m -i wlp3s0 -w active_hosts.txtBreaking down each argument and it's meaning:
-t 2mflag instructs the sniffer to stop listening for new packets after two minutes.-i wlp3s0specifies wireless interface we want to listen on. You can find name of yours by runningiwconfigcommand.-w active_hosts.txtwill save addresses to a text file after the sniffer finishes it's work.

After hosts are written to a file, we can check if everything went right by inspecting contents of the newly created active_hosts.txt. Netenum provides some additional info about current network, such as its name, signal strength, MAC addresses and default gateway mark. When writing found hosts to a file, this tool also ensures that both multicast address (255.255.255.255) and local IP address of our machine are omitted.
Hosts discovery - Nmap
Another method to write all active hosts to a file is to perform a ping scan (-sn) with Nmap and parse it's output. To easily find which host is up, we will use -v flag to increase output's verbosity. This way, a status message that looks something like that will be printed for active:
Nmap scan report for <ip>
and for non-active hosts:
Nmap scan report for <ip> [host down]
It seems that all we have to do is to grep for occurrence of report for and invert grep of host down. Also, we should exclude each line that contains addresses that are enclosed with standard brackets, such as (192.168.1.1). Full command:
$ nmap -sn -v -n 192.168.1.1/24 | grep "report for" | grep -v "host down" | grep -v "("The -n flag is added to ensure that no DNS resolution is performed, so that only IP addresses are shown in the summary.
Almost done - output of the above command looks like this:
Nmap scan report for 192.168.1.1
Nmap scan report for 192.168.1.112
Nmap scan report for 192.168.1.102
Now we need to save entries of the last column to a file - we will achieve this using awk '{print $NF}'.
Final version:
$ nmap -sn -v 192.168.1.1/24 | grep "report for" | grep -v "host down" | grep -v "(" | awk '{print $NF}' > active_hosts.txtNote: Type of the discovery probe that is used in ping scan can be specified using -PE, -PP and -PM flags.
Passing discovered hosts to Nmap
This step is as simple as reading our save file and joining each entry (so each IP address) with a , character. We will use a very simple command (paste) for merging lines from a file. Syntax looks as follows:
$ paste -sd "," <our_file>-dflag enables us to select a non-default delimiter (default is a single TAB)-smakes sure that the whole file is read at once
And now inside our Nmap command:
$ nmap -D $(paste -sd "," active_hosts.txt) <target_host>Note the presence of $() enclosing - it will be replaced with the output of the command rather than the command itself.
Spoofing source address with random active host
Another useful option within Nmap is the -S flag - it allows us to specify a single IP address that we want to set as source in the packets that are being sent to target. Here, we will randomly select any address from the pool of discovered hosts. Unix built-in shuf command seems to be a perfect choice:
$ nmap -S $(shuf -n 1 active_hosts.txt) <target_host>Parameter -n 1 instructs shuf to select one random line from the input file.
Spoofing source port for traffic blending
In order to spoof the port of our outcoming packets, -g flag should be used. We will define an array with common, low-numbered ports, and randomly select port from it every time a scan is performed. This way, our traffic will look more legit.
$ common_ports=(21 22 445 80 8080)
$ random_port=${common_ports[$[$RANDOM % ${#common_ports[@]}]]}
$ nmap -g $random_port <target_host>
Final words
This was a first post from the "Exploring Nmap" series. In the next part, we will go over using public proxies for scanning.